All paint products and paint colors needed are listed below. I have linked all needed tools/paint products in my LikeToKnowIt so you can easily add the supplies to your Lowe’s cart: http://liketk.it/2Ty31
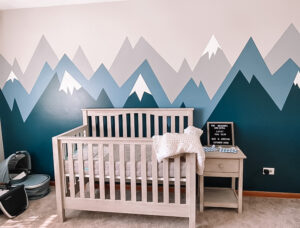
I have to start off by saying how AMAZING Bert did on the nursery wall. I was impressed, but when people keep asking where we got the wallpaper, you know you did GOOD.
So, I wanted to let everyone know the process it took since others wanted to do the same.
Paint colors we chose (all in satin):
TIP* Any unused (I assume unopened) paint from Menards is returnable for refund! Better to have it all made at once and have extra so the tint/color mix throughout your project is consistent.
Nautica branded colors:
Close mountains (darkest blue) 2 qt. : Nautica Deep Atlantic NT467
Middle Mountains 1 qt. : Nautica True Quarry NT486
Evergreen Trees 1 qt. (not pictured) : Nautica Beach Pine NT444
Snow Caps (sample size) : Nautica Seafoam White NT633
Dutch Boy branded colors:
Main walls & Background 3 Gal. : 439-2DB
Back Layer mountains 1 Qt. : 435-4DB or 435-2DB (confirm preference before purchase)
If we had a girl, Bert had shades of pinks picked out for mountains. He was dedicated to the mountain theme, and I loved it too.
Step 1: Paint the background color.
Tip: Before you ever use a can of paint, shake well and stir with a paint stick. This will assure your paint color is consistent throughout.
For us, this color was also what we painted the rest of the room walls. You don’t have to paint the entire accent wall because you’re going to be painting mountains on them. I’d say we covered the top ¾ of the wall. We let it dry over night for each layer we did. I’m sure that’s not necessary, but this way there was no risk in pulling paint off with the tape.
Look at that proud Daddy to be! 🙂
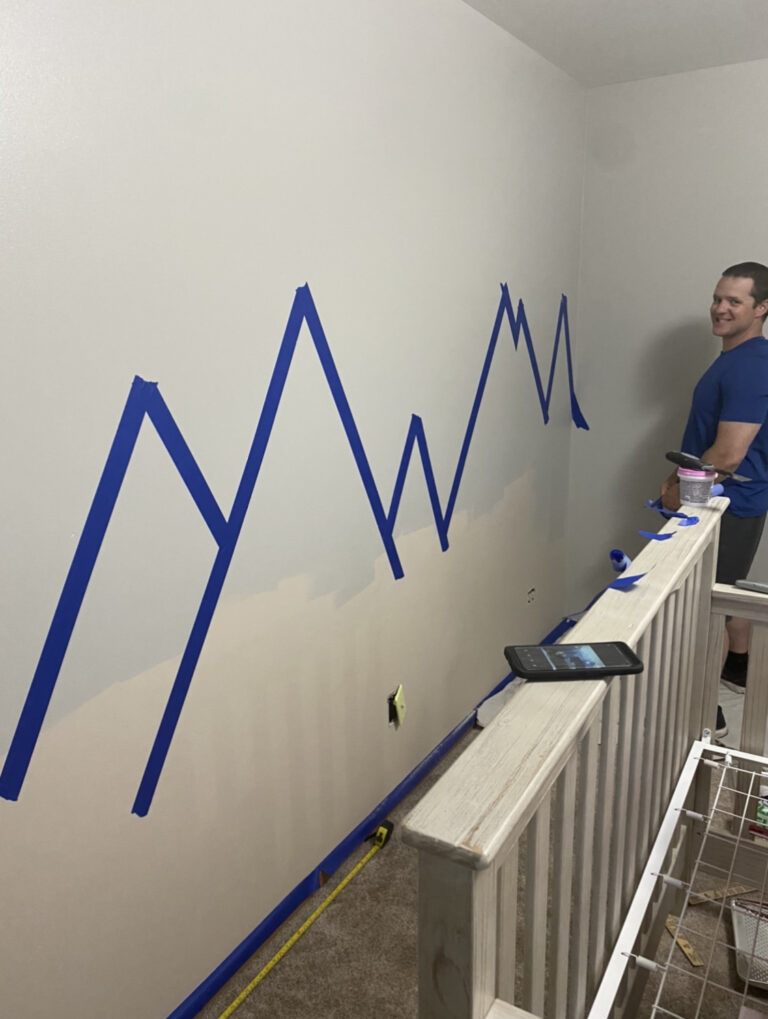
Step 2: Mark where all peaks will be.
I think the hardest part was choosing where the peaks were going to be. We didn’t want it to look like all the triangles/mountains were perfect.
Bert put little pieces of tape where he thought ALL of the peaks to go to picture how it would look before he started to tape them. So little pieces, like 1 in. to mark the peaks of all 3 layers. Then as we painted layers, we moved the next layer’s peaks around before we painted.
Step 3: Tape off where you want the front layer of mountains.
This will be for the front color that goes all the way to the floor.
After he had the peaks marked, he taped all of the edges of the front layer mountains and connected to the peaks all the way from one side of the wall to the other while leaving them to cross each other on the bottom forming valleys. Also recommend taping the neighboring wall edges. Put the tape on the opposite wall so the mountain color doesn’t get on the solid wall color. This made the edge lines perfect.
Step 4: Razor off excess tape to form triangle for valleys.
BE CAREFUL not to press too hard, because you will cut into the paint beneath it. Not a big deal, you’ll be the only one to notice it… and your spouse J. Your spouse will notice. You do not have to razor off the ends of the tape for the tops of the peaks. Only the valleys because you will have to re-tape for the second/middle layer of mountains or else you will obviously have a stripe in the middle (which is also another cool way to do the wall that is much easier).
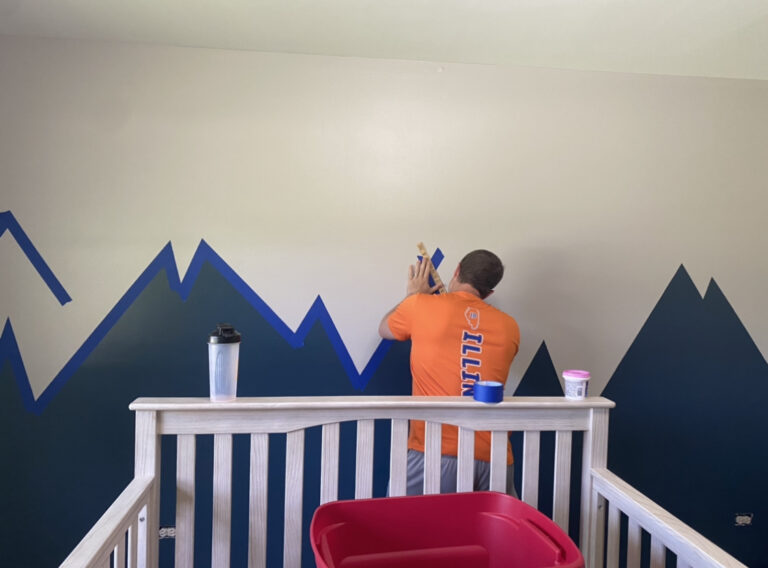
Step 5: Paint front layer of mountains.
This is again the layer that the color will go across the entire bottom of the wall. The white peaks are last. We just painted all of the layers of mountains before choosing which peaks were going to have white caps so we could visualize it.
We did 2-3 coats of each layer. It’s not that much paint and just thought it looked the best. Allowing 3-4 hours between each coat for it to dry. So this took some time overall, but sometimes the painting increments were only 15 minutes. We used a 2” angled brush to paint the edges of the mountains and would start with the brush on the tape and slide onto the mountain to avoid pushing paint underneath the tape if there was any room for it to bleed through.
Tip: Before painting, run your hand over the tape and press hard to the wall just in case the tape has lifted at all. We would even tape one day, and paint the next just because it was the most time consuming step… and the least fun haha.
Tip: Remember to wash your brushes out in between coats. We just left them to dry on the edge of the sink in the nearby bathroom. You can wash out your rollers too, but honestly, they come in a pack of 3-4 so we just used a couple extra.
(Once final coat is complete, I recommend leaving overnight before pulling tape.)
Step 6: Remove tape from front layer of mountains.
Do this slowly and try to create as much of an angle upward as possible to avoid the paint attached to the top of the tape pulling paint from the front layer mountain with it.
Step 7: Tape the middle/second layer mountains.
Unfortunately, this also means, re-taping the other side of the front layer mountains. So this will create the boundary between the front and middle layer mountains. Then tape the peaks of the second layer mountains as you did for the front layer. Again, we took small pieces of tape to mark where we thought the peaks should go. Leaving the excess at the top creating the perfect peak, no need to razor that part off because you will remove this tape before painting the final back layer mountain. Then carefully razor off the excess for the valleys.
Don’t forget to tape the corners again to prevent the middle layer mountain bleeding onto the neighboring wall.
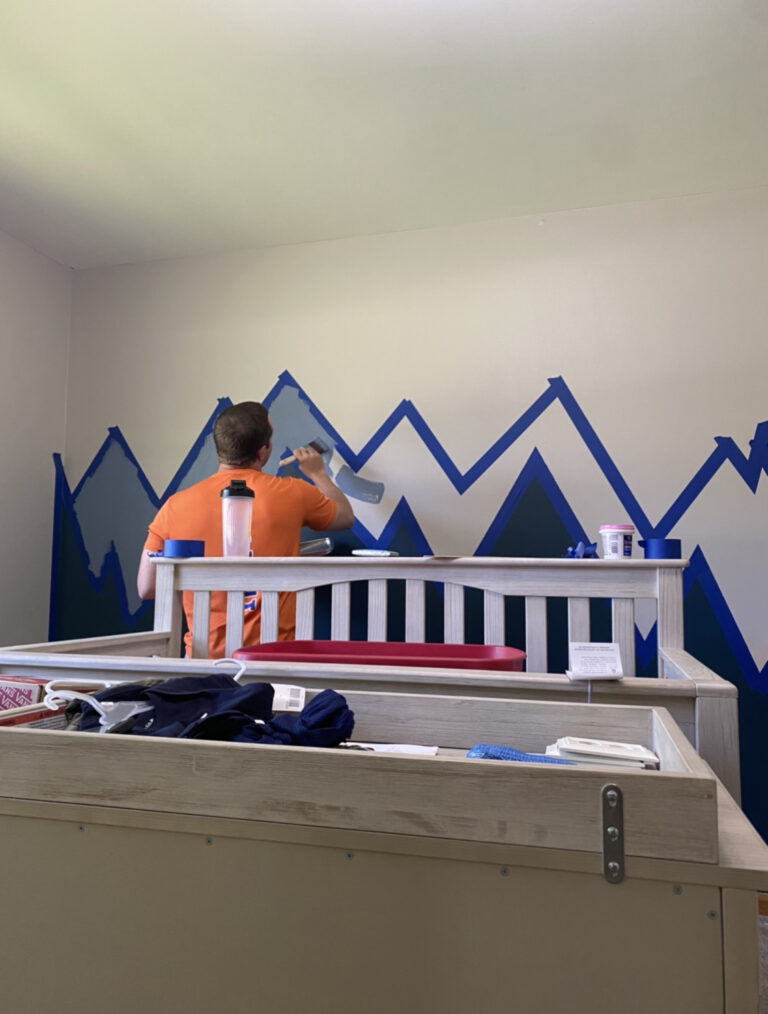
This was a long step, so Bert did the taping in the morning and we painted the middle layer that evening.
Below, you can see him re-taping the first layer mountains in preparation for the middle layer painting. He waited until the re-taping was complete until he chose the final peak layout for the middle mountains.
Step 8: Paint middle/second layer of mountains.
We again first used a brush for all edges. Starting on top of the tape to avoid the bleeding beneath. Then we used a small roller for this just because it was much less space. 2 coats minimum. We tried with just a brush, but there was no hiding the brush strokes and just didn’t like the contrast texture.
Let dry overnight before removing tape.
Step 9: Remove tape from second layer mountains.
Again, do this slowly and creating an angle by pulling upwards seemed to work best for me.
Step 10: Tape the edges for the 3rd and FINAL layer of mountains.
We took a second and thought about which peaks we would want to have the white caps and moved a few of the final peaks around for this layer so the white caps would look best.
Repeat what you did for the middle layer mountains as far as taping. Tape off the bottom edges, the peaks, the valleys (razoring off the excess), and the edge for the neighboring wall.
Step 11: Paint final/back layer of mountains
We lined with a brush like we did the others (see below), and finished with a small roller.
Let dry overnight.
Step 12: Remove tape.
Although you could technically not remove the tape for the mountain you chose that will have a white cap, we just wanted to stand back and look at the finished wall before making the final decision which peaks would have the white caps.
Step 13: Tape off the peaks you chose to have white caps.
Try not to make the bottom angles of the caps look all the same. Some of ours start upward/downward, etc. (see photos).
Step 14: Paint white caps.
Painting the first layer with a brush worked best for us because the roller seemed to bleed through the edges. We thought about leaving the brush stroke texture for the caps, but I just decided I wanted them all to have the same look.
Leave over night before pulling the tape.
Step 15: Touch ups.
You can re-tape any lines that need touched up. Probably things only you will notice anyways. Downside of it being your own masterpiece is that you know all the “flaws”.
BUT, you’re FINISHED!
We were going to paint small evergreen trees also, but I bought too much furniture, haha, so you wouldn’t see them anyways. Maybe next time I guess!
I hope you enjoy your new mural as much as we do J.
xo Katie